

Quick Start
Welcome to Framework. This guide walks you through the first things to do after signing in so you can create and share designs with confidence. You do not need screenshots for this part. Everything is described in a straightforward way that you can follow at your own pace.
Start in Settings
Once you sign in at go.getframework.app the best place to begin is Settings. This prepares your account and makes sure Framework can publish content for you.
Connecting your social accounts lets you publish and schedule directly from Framework.
You can connect Facebook, Instagram, Google Business Profile and LinkedIn and more.
You will also see Publishing Schedule.
This is where you set a small queue of posting times. Many teams choose two or three slots during the week.
When you publish something later you can add it to the queue and Framework will place it in the next available slot.
Exploring the template library
Your day to day work will happen in the template library on the left side of the app. Templates are grouped by category so you can browse until you find a design that suits what you want to create.
When you click a template you enter the customisation screen.
Customising a template
Edit the text
Click on the fields and type your own copy.
Text will resize for you.
It helps to look at the thumbnail as a guide for roughly how much text to use.
Choose or upload images
Many templates allow you to upload your own images. Any image you upload is saved in Framework so your team can use it again for future designs.
Use image categories
Framework provides curated image categories when you sign up. you can select from brand images or images that you and your team have previously uploaded and saved to Framework.
Add badges when available
Some templates include optional badges.
These can be used for things like awards or local achievements.
Use AI to fill the template
Select the AI option and write a quick prompt.
Framework fills in the text fields for you using your brand guidelines.
When you are ready, select Create.
Framework will tidy up your layout and create the final design. This usually takes around ten seconds.
After the design is ready you can preview it, download it, share it, or return to edit the template if needed.\
There is also an option to report a problem if something does not look right.
Sharing to social media
Sharing opens a simple modal that guides you through the steps.
Pick an account
Choose one or more connected social media accounts. If none appear go back to Settings to add them.
Add a caption
Write your own caption or use AI to create one from a short prompt.
Some templates have a recommended caption which you can insert.
You may see placeholders for local details such as a phone number or website.
Click them and type in the correct information.
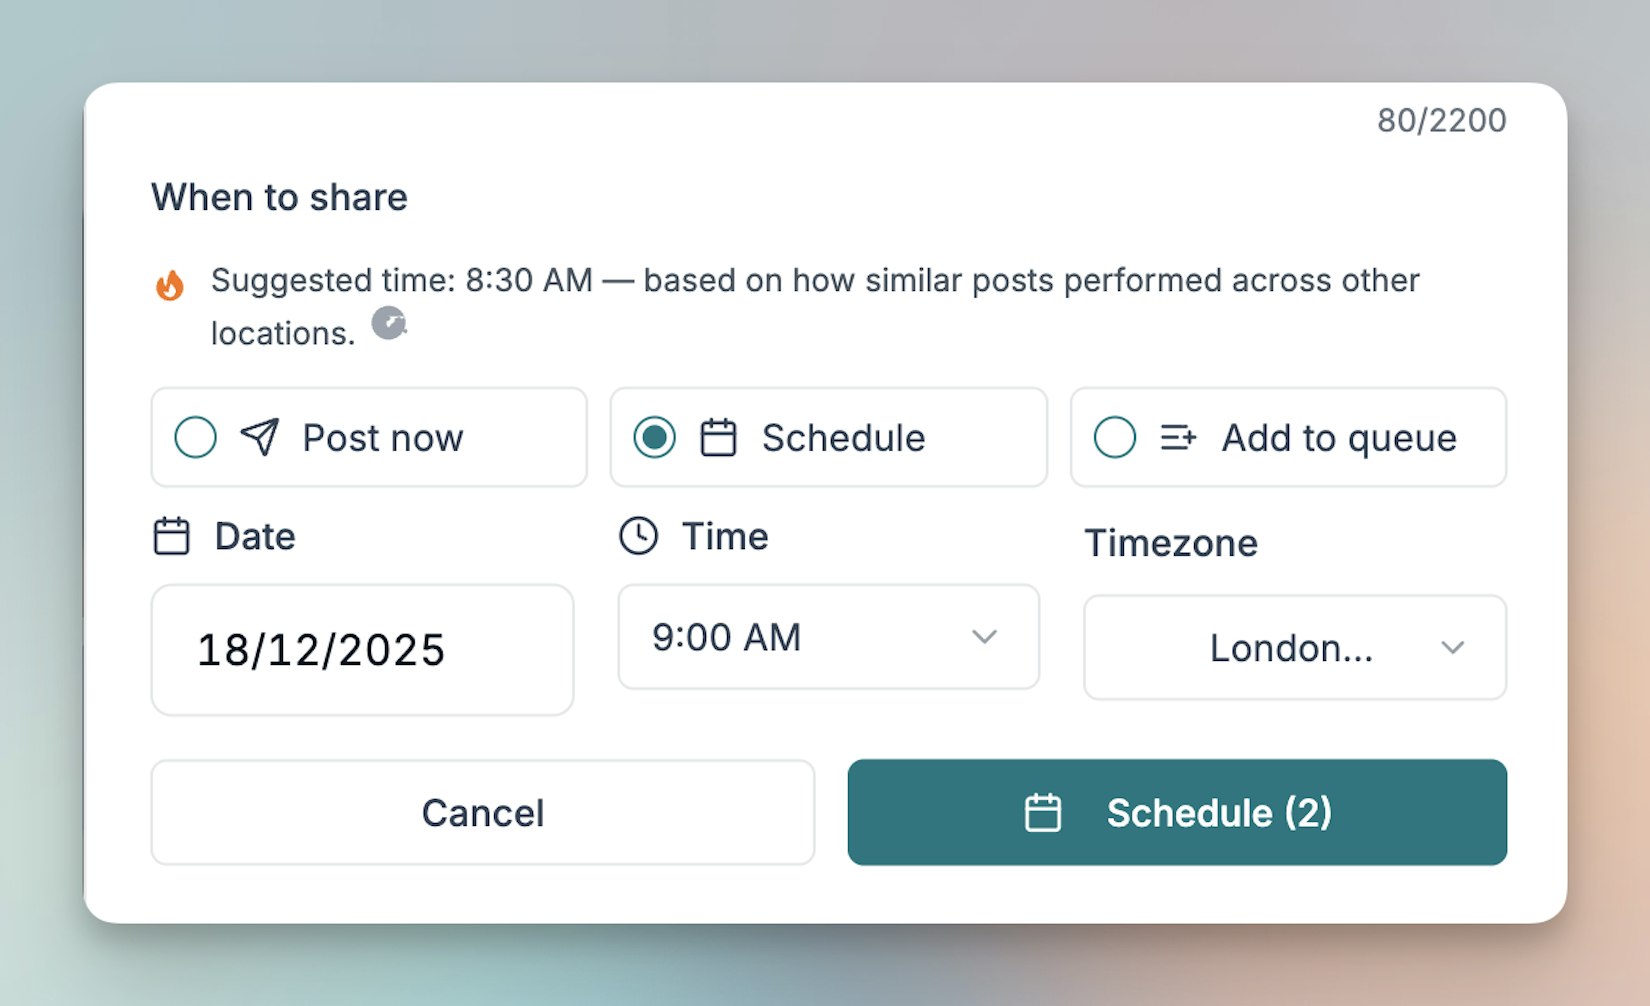
Choose when to publish
You can post immediately, schedule for a date in the future, or add the post to your queue.
Framework also suggests a posting time based on performance data from similar content.
Finding your past creations
Everything you create is saved automatically.
Visit Assets then Created Graphics to see up to 90 days of your designs.
You can view who created each design, download it again, edit it or delete it.
You can also select multiple items if you want to delete several at once.
Managing your image library
In Assets and Images you will see two areas.
This guide covers the basics. Once you have created a few posts you can explore the Planner and other advanced tools whenever you are ready.
Last updated today